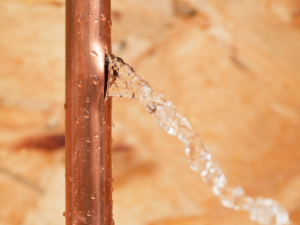
Cold weather is here, and if you live in an area that’s prone to cold weather (below 32 degrees), then you know that’s when pipes can begin to freeze. If you suddenly find that water won’t flow from one of your faucets or fixtures, it’s likely due to a frozen pipe. Once a pipe freezes, it’s only a matter of time until it bursts. When a pipe does burst, it’s due to water expanding; once it freezes, water can exert pressure at over 2,000 pounds causing a leak at the joint or crack on the length of the pipe.

*Fact | Water damage from bursting pipes is among the most common homeowners insurance claims!
Pipes are most susceptible to freezing when they are located,
– In an outside wall
– In a cabinet under a sink
– In an unheated crawl space or basement
– Near outdoor faucets used to connect garden hoses
Learning how to identify a frozen pipe is the most crucial piece of knowledge to learn to thaw when you are dealing with this issue. When you are searching for the source of the leak, the first step is to shut off the water supply and open the connected faucets in case it bursts, as it can act as a plug, preventing the water from spilling out. Once you find the frozen pipe, you will see a water line coated in frost or bulging, which is a good sign that it’s still frozen but not all plumbing pipes that are affected could be visible.
If your pipe(s) are frozen but not yet ruptured, it is important to thaw right away so you can prevent a burst pipe and prevent water damage. You can do that in various ways listed below:
- Apply heat to the frozen area using a hand-held hair dryer on its lowest setting
- Wrapping an electric heating pad around the pipe
- Wrapping the pipe with towels that you’ve soaked in hot water
- Wrapping thermostatically controlled heat tape
- Using a space heater
- Heat lamp
*Tip | You should apply the heat until you see full water pressure return to the faucet
Using any of the methods provided to thaw frozen pipes typically takes about 30 minutes. This can vary depending on the weather, how long the pipe has been frozen, and where the pipe is located.
No matter the defrosting device you decide to use, make sure to watch where the ice melts to avoid standing water and the risk of electrocution. If you notice any leaks in the line after you thaw out the frozen area, be ready to cut off the main water supply and call a professional.
If a pipe has already burst in your property, it’s recommended that you act fast to mitigate additional damage. Shut off the main water supply to minimize the damage, as well as the electricity in the area affected. Immediately start to dry out the area with mops, sponges, towels, and a wet/dry vacuum. To help the potential growth of mold and mildew, it’s recommended that you run a dehumidifier until it’s VERY dry. Depending on the severity of the damage, you may need to bring in professionals like Duckstein Restoration to address damage to your structure and contents.
To prevent a similar situation from happening in the future, it’s good to take proper measures such as:
– Having proper pipe insulation to prevent freezing unheated spaces like attics, basements, or garages
– Sealing cracks in walls to keep cold air out
– Keep your home heated to 55 degrees or more
– During times of SEVERE cold weather, open your cabinets to keep heated air circulating and faucets slightly open to keep water running through
– Winterizing outdoor faucets by removing hoses, insulating them, and shutting off your outdoor water supply
If you suspect that you have frozen pipes in your home, you need to act fast to prevent water damage! Use the information above to locate and thaw the pipe so you can evaluate the damage and determine if further repairs are required.